Event Details Popup
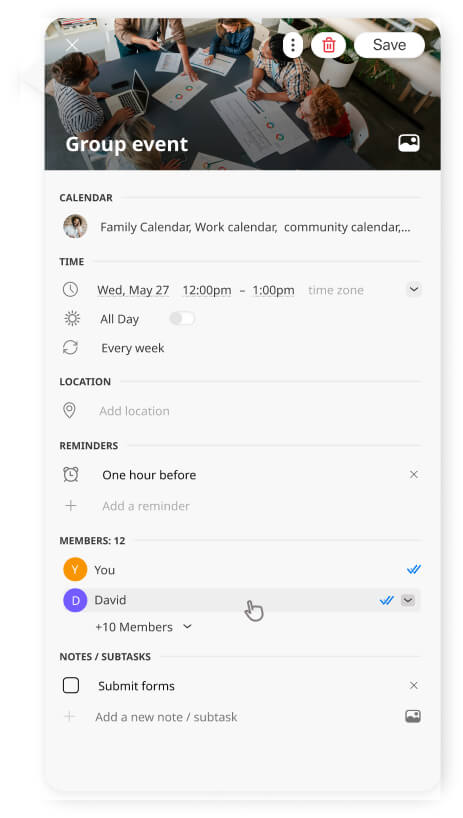
The event details popup in GroupCal allows you to customize various properties of your events, such as their title, time, address, and more. This popup provides a user-friendly interface for easily configuring and managing event details.
GroupCal utilizes the same type of event details popup across the app, whether you are adding new events or editing existing ones. This consistent design ensures a seamless user experience and makes it convenient to access and modify event information.
This article will discuss the details of the event details popup, providing in-depth information and instructions on how to utilize this powerful tool. You will learn about the various features and customization options available within the event details popup, enabling you to effectively manage and configure your events in GroupCal.
Title Section
The initial step in the event info popup is to enter your event title. This allows you to provide a clear and concise name for your event that will be displayed in the calendar. By choosing a descriptive and engaging event title, you can capture the attention of your audience and generate interest in your scheduled activities.
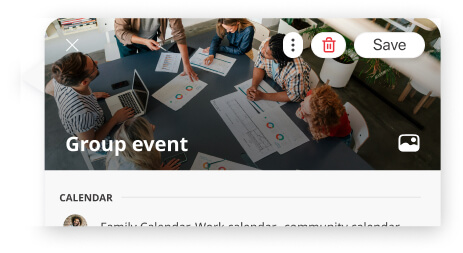
Event cover Image
To make your events more recognizable and visually engaging, you can add a high-quality cover image to any event. This serves as a strong visual anchor, helping your calendar members quickly identify the event’s purpose.
How to Add a Cover Image:
- Click the image icon located directly next to the event title field.
- Select an image from your device’s library to upload.
Where the Image is Displayed:
Once selected and saved, the image is automatically synced and displayed in two key areas:
- Event Details Screen: The cover image is featured prominently at the top of the event details screen, visible to all members when they tap on the event to view its description.
- The Cards View: If a user configures their main screen layout to use the Cards View, the cover image will display directly on the event card itself, transforming the calendar into a highly visual, easy-to-scan timeline.
Storage and Plan Limitations:
Attaching images to events consumes data storage. The total storage quota available for your calendar is determined by the active plan of the calendar owner. If your calendar reaches its designated storage limit, you will need to upgrade to a higher plan or remove images from older events before you can attach new ones.
Calendar Section
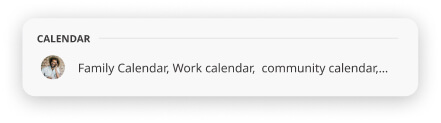
The section indicates which calendar the event is saved on.
While choosing the calendar for the event is read only for existing events, it can be modified when adding new events.
When adding a new event, GroupCal will assign the default calendar as the one for the new event. This calendar can be changed for the new event added, by following these steps:
- Click on the calendar name currently set and shown on the event details popup
- This will open another popup with the list of available calendars to choose from. The list of calendars is identical to the calendar list on the main screen of the app. Some of the calendars might be disabled with an appropriate icon next to them because they don’t allow saving events into them. This might be due to several reasons, such as they are hidden from the All Calendars screen, and therefore allow to add events only from their calendar screen.
Sync Events Across calendar
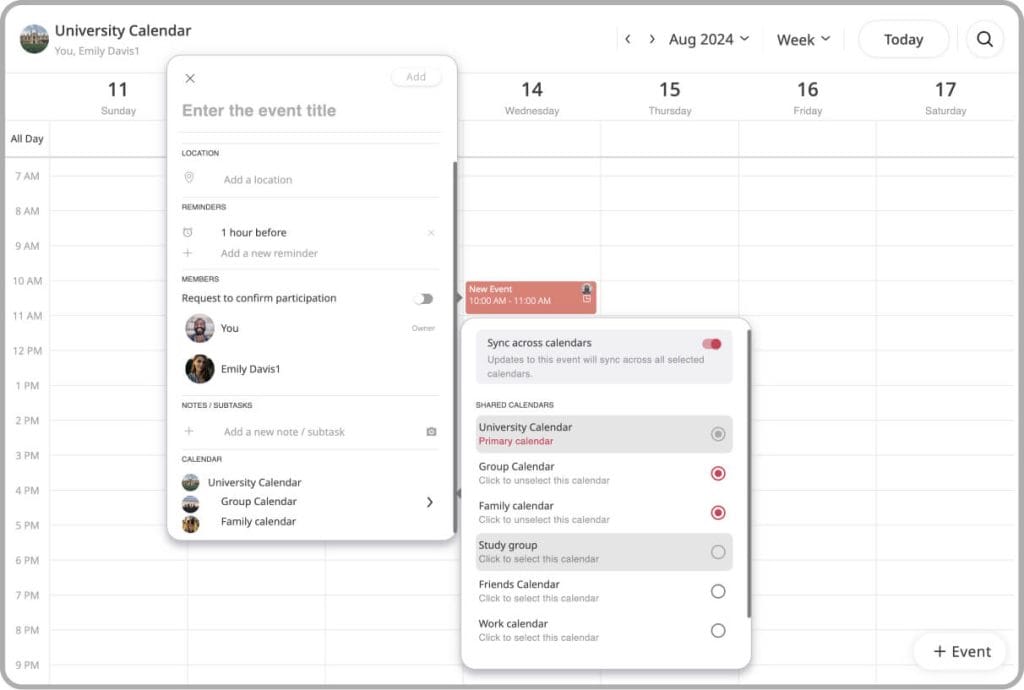
GroupCal’s sync events across calendars feature gives you the option to save events to multiple shared calendars. Whether it’s syncing a company meeting across different departmental calendars or organizing sports team practices across team and venue schedules, GroupCal ensures that any updates or changes are instantly reflected across all relevant calendars.
By selecting the right calendar, you can keep your schedule well-structured and easily accessible.
Time Section
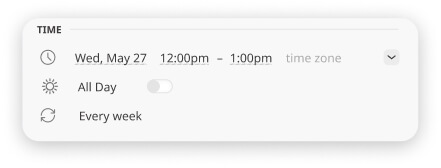
The Time section operates in two viewing modes to keep your scheduling workflow clean and efficient:
- Collapsed Mode (Default): Displays the date and time in one row
- Expanded Mode: Tapping the expand button reveals separate rows for the start and end date, which allows configuring multi-day events.
Dates and times
- Will open popups to set the dates and the times
- When setting the time, there is an option to set a time zone (see Time zone section below)
Time zone
- Time zone on the event details popup appears only in case the event is set based on a time zone different from the system’s time zone, and only in case you are the organizer of the event. This means that by default, the time zone row is not going to show on the event details popup.
- Setting the time zone is done when setting the start or end hour of the event. The time zone selection is part of that popup.
- When a time zone is set, the date and time of the event as you set it on the event details popup are going to remain (ex: Jan 1, 5pm), but the event is going to be listed on the calendar based on the time zone you set on the event. Thismeans it will not be shown as Jan 1 5pm but rather it will be shifted to be shown on the correct time slot based on the timezone set.
All Day button
- Allows to set the event as an all day event, or otherwise to turn an all day event to a non all day event.
- When you toggle on the All Day button, the buttons that allow to set the hour of the event will automatically disappear. This allows you to set the event with only the date, without specifying the start and end times. This feature is ideal for events that span the entire day, such as holidays or all-day meeting
Recurrence
- By clicking on the recurrence button in the event details popup, you will be prompted with another popup that allows you to set the recurrence for your event. In this recurrence popup, you have the flexibility to specify the type, frequency and end date of recurrence
- You can set the type of recurrence by day, week, month, or year.
- You can set the frequency to be every 1,2,3,… days, weeks, months, years.
- Additionally, you can choose whether the recurrence should continue indefinitely or until a specific end date.
Location Section
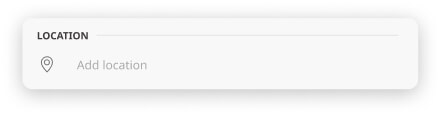
You can add the location of the event by entering the relevant address details. GroupCal provides a convenient feature that allows you to view the event location on a map once you enter the location The map will show only in case GroupCal is able to find it in Google addresses database. This functionality helps provide a clear understanding of the event’s geographical context and enables participants to easily navigate to the event venue if needed.
Reminders Section
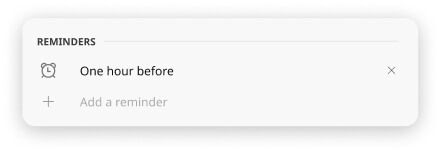
You can set up reminders for the event in the designated section of the event popup. GroupCal allows you to add multiple reminders per event. Reminders that you set are only applied to your app and not to other members. That allows each member to set event reminders based on personal preferences.
To add a new reminder:
- Click on the “Add Reminder” button to add a new reminder.
- In the reminder options, choose from various predefined time intervals such as “on time,” “5 minutes before,” “10 minutes before,” “15 minutes before,” “30 minutes before,”
- In case you want to set a more granular reminder time, click on the Custom… option which is the last one on the reminders popup That in turn will replace the reminders popup with another one that allows you to enter exact number of minutes, hours, days or weeks before the start time of the event, for the reminder to be presented.
Members / Participants Section
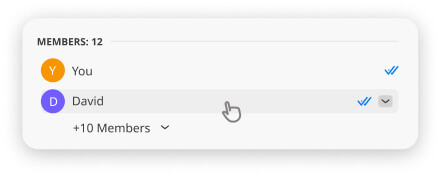
This section has two variations:
For Personal Calendars events – Participants section
Personal Calendars events behave differently than shared events. They allow you to send invites separately per each event. That is why GroupCal allows adding participants per each Personal Calendar event.
To add participants to a Personal Calendar event:
- Click on the “Add Participant” button
- Enter the email addresses of the individuals you want to invite or share the event with. You can add multiple participants.
Once the event is saved, the added participants will receive an invitation email from the calendar account of the event, allowing them to add that event to their calendar.
For Shared Calendars events – members section
Shared events have preconfigured members based on the member list of the shared calendar they are associated with. So the member list of shared events is constant and cannot be modified.
Request to confirm participation
Once enabled, this event will request all members to send a confirmation response for their attendance. By default this is off, but optionally you can enable it.
Event ownership
By default, the member who adds the event is assigned as the event owner. Calendar admins can right click on another member, and assign ownership over the event to that member, making it clear who’s responsible for each event. Assigning event ownership can be done for either new or existing events. Once assigned, the event is updated with the calendar member’s color and photo.
The list of members will list up to 3 members or participants. In case there are more members that are part of the event, the event details popup will have a button at the bottom of the members list that allows to expand the list to show the full like of members.
Going Bar Section

This section indicated whether or not you are attending the event. If you turn on “Request to confirm participation” under the Members section, then once you add the event, all members receiving the event will be prompted to click if they are going to participate by clicking the Yes, No or Maybe buttons. With this, you will be able to see next to the participants name in the event if they are going, have not responded, or not going.
Notes Section
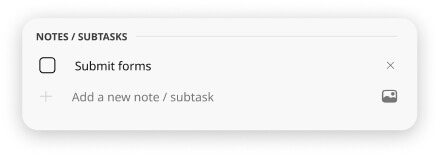
You can add notes or subtasks within the event. This feature allows you to provide additional details or instructions related to the event. Whether it’s jotting down important information or breaking down the event into manageable subtasks, adding notes or subtasks helps you stay organized and ensures that all the necessary information is readily available within the event itself.
Adding new notes:
To add multiple notes within an event, simply enter your first note and press the “Enter” key. The text space will expand, allowing you to enter another note. You can repeat this process as many times as needed to add multiple notes within the event.